Monday, April 16, 2018
bouncing ball
For this project, we returned to the classic bouncing ball project. We started out by heading downstairs and taking videos of us dropping a golf ball, a bowling ball, and a tennis ball from five feet. We then took those videos into Photoshop and measured out where and when the balls hit the ground. Once we had all the measurements, we went into Maya and modeled the balls. I really liked the way my golf ball and bowling ball turned out, but I feel like my tennis ball could have looked better because it is smooth. The bouncing turned out really well. I really liked this project and the only thing I would change is the tennis ball.
Wednesday, April 11, 2018
Perks of Being a Wallflower
For our movie trailer, my team recreated the Perks of Being a Wallflower trailer. We had to recreate the video as close to shot-by-shot as possible. There were some scenes that we couldn't really shoot (the homecoming scene specifically) so we had a bit of creative freedom there. We had to work around two work schedules, a rehearsal schedule, and a softball schedule; finding time to shoot proved to be a little difficult.
We had two main days that we did the bulk of the filming. It was very hard to find extras that were willing to shoot over the weekend. Our main cast was very helpful in getting everything done and squared away, luckily. It was sort of hard to wrangle extras when filming and that set us back a little bit each day. We worked right up until the deadline. We tried to edit at home, but something wasn't converting correctly and we weren't able to. Both Jenna and I have different editing processes and I took a little longer than she did. Some of the clips came through without sound and we had to reconfigure our project to use the voices and sound from the original trailer. It proved to be sort of difficult to make your clips match the original trailer when you didn't have them saying it with the trailer to begin with.
I learned a lot about how to manage people and how to communicate. I had a really hard time at first trying to get people to listen and to do what we needed them to do. It took most of the process, but by the time we were almost done filming, I had learned -mostly- how to direct people and be patient with them. I think patience was a ting I had to learn. You have to make your point clear and wait for them to fully understand and not get frustrated with them.
If I could redo this I would make sure all of our actors were talking with the actual trailer so their lines matched up. Or, I would be more careful with the sound and making sure it came through correctly. I really liked the way our music video was planned out with the locations and actors. I thought we did an alright job planning it out and making sure everyone was on board and on schedule.
Monday, March 5, 2018
Snowflake Animation
This project was definitely on the longer side. We went in making the snowflakes and that took a really long time because you had to make them look like plausible snowflakes. Once you had all of your snowflakes done, you had to make them 3d and smooth them. This was one of my least favorite steps. Making them smooth was a whole process on its own. They look wildly different smoothed versus un-smoothed and it really makes away from them toking like real snowflakes. There were also a lot of problems for me with the polygons and that made it difficult to even get to the smoothing stage. Once that was done and you would make your window. something weird happened to my window but since you really can't see it, I'm not going to go into it. The animating of the snowflakes went mildly well. After finishing all o the snowflakes, I had to go back and make sure you couldn't see them through the window t the end. Then, I realized that they spun way too much as they fell and that they weren't spread out enough. Fixing that would have required taking out every single key frame and restarting the animation portion. I am mostly happy with the way this turned out, especially through the window.
Thursday, February 15, 2018
Now It Spins!
We can animate with Maya now! We took our last project (the ice cream shop) and made the ice cream cone, scooper, and bowl of ice cream spin.
Process
There really weren't all that many steps in the process, but it still took me a long time to really figure out. I hit a bump pretty early on trying to get it to actually spin. The pivot point wasn't in the center so when it would spin it would go off the table. You know, as it does. I had to call in backup to figure out how to fix it. Luckily, we did get it fixed and could get back to work.
Rendering turned out to be a whole different story. It took me days to get it out of the door. I had a really hard time finding all of the different required steps and settings and that really set me back. I had to render it out a couple times to get it to actually work right. Once all 120 pictures were rendered, we put them into After Effects. This all made me run out of time to go back and fix the bump maps.
Bump maps and Textures
If you watched the video, you may have noticed something was off. The bump maps and different textures look normal when they are still in Maya, but that's not quite true when you're watching it as a video. If you look closely (or even at all), you will notice that the textures and bump maps don't turn with their respective objects. But, you know what, for my first ever 3d animation, I think it turned out pretty good.
Final thoughts
I can't even imagine what our next 3d animation will look like or if it will be this simple. I'm excited to see what's in store!
Tuesday, January 30, 2018
Salt Shaker

Thursday, January 18, 2018
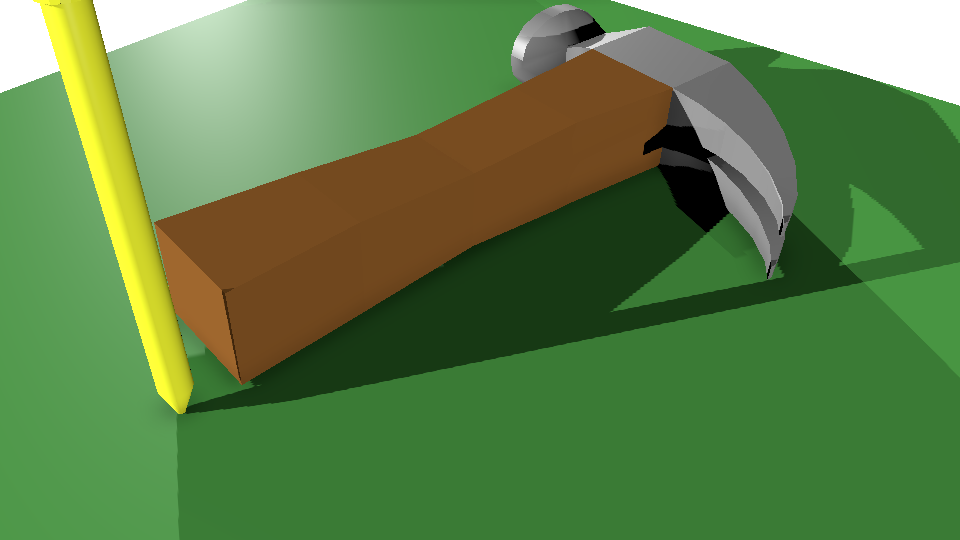
Hammer time!
For our next Maya project, we were tasked with creating a hammer and nail. Now, this project was difficult and surprisingly frustrating for me. I got sick in the middle of it and missed days of work. But, I ended up getting it finished and I think it turned out all right!
Lucky for us, we had instructions to go off of and follow in Google classroom. There were a couple of small detail instructions missing here and there and that made it pretty hard for me to keep a steady pace. I got stuck for a while trying to figure out how to get the back end of the hammer to split in two. This was the point that I missed three days of school. When I came back, I was more confused than when I left, but I ended up figuring everything out. Mr. Olson got an updated version for us to work off of and that helped a lot. I was finally able to get the shape of the back end of the hammer right and move on to the other side. The head of the hammer took a couple tries for me to get right but I figured it out. The shape of the handle was the easiest and fastest step to get done. The nail took a couple tries, too, but I got it done and out of the way.
Shading was easy even though it took a couple tries. My hammer was sort of dark in the end, but it's at least the right colors. The grey is sort of off and the brown doesn't go with it really well, but hey, it works. My nail is a nice yellow-gold color and it's rocking and living it's best life. I like the way my nail turned out.
The first time I attempted three point lighting it was close to a disaster. I tried, like, six times and I ended up needing close to six people to figure out where I went wrong. This time went much better, luckily. I think I only needed one person to keep me to the right track and got it done sort of quickly. Sadly, when I got into rendering something was off and I had to readjust the lights a lot. I still really don't understand the process of rendering if it doesn't go well the first time. I can't really adjust it well. I had someone help me with the rendering and I got it out of the door!

Subscribe to:
Posts (Atom)